Figuring out how to remove a bathroom sink drain in Springfield, IL starts with one simple fact: there's no single universal method. The right steps depend on your stopper mechanism and whether you're removing just the stopper or the entire drain assembly. This guide was built from real service calls across Springfield, IL, where lift-and-turn stoppers, pop-up assemblies, and flip-it drains all show up in roughly equal numbers.
Below, you'll identify your stopper type, gather the right tools, and remove both the stopper and the full drain assembly step by step, with no guesswork.
Types of Bathroom Sink Drains
Before you touch a wrench, look at how your stopper operates from the top of the sink. Identifying the mechanism first keeps you from forcing a part that comes apart a completely different way, which is the fastest way to crack a stopper or strip a knob.
On service calls across Springfield's older neighborhoods, lift-and-turn stoppers tend to corrode shut more often than any other style, especially in homes built before the 1980s with original fixtures still in place.
Pop-up Drain Stoppers
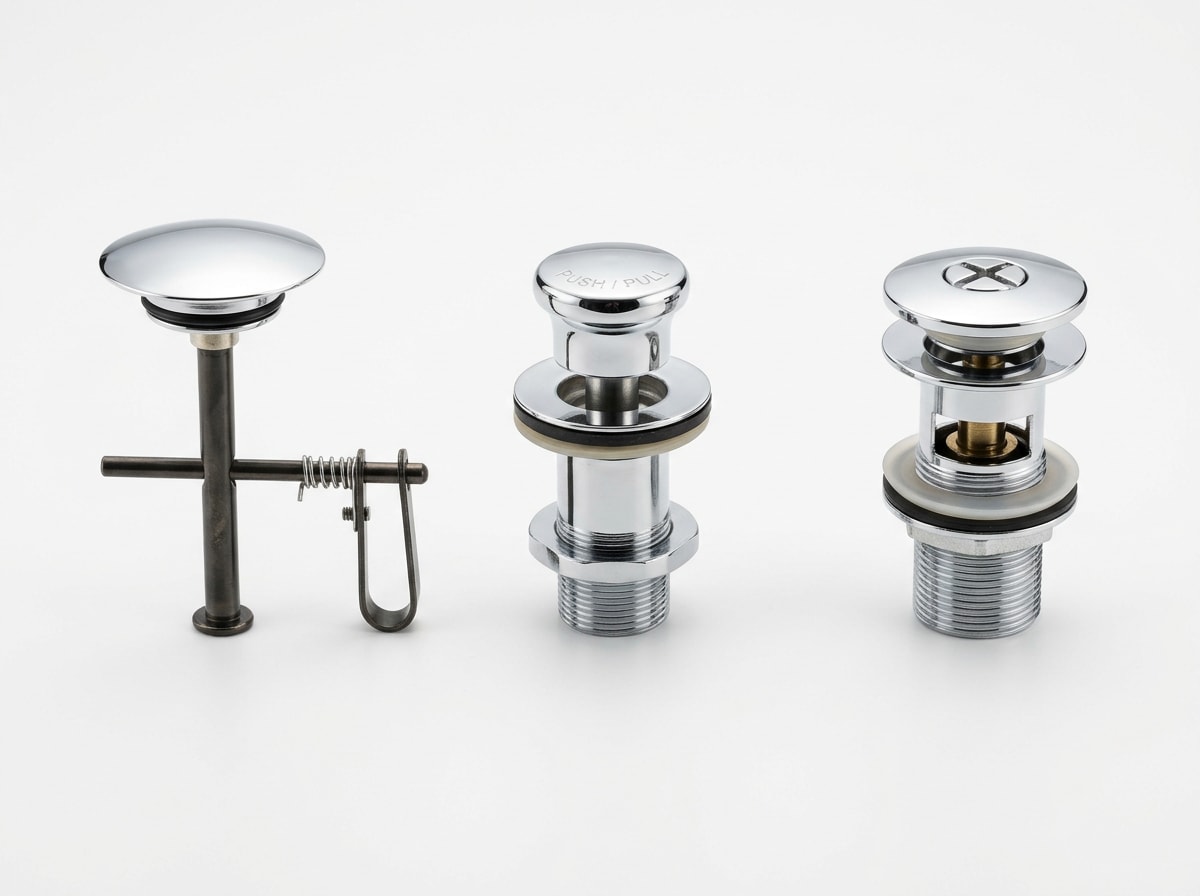
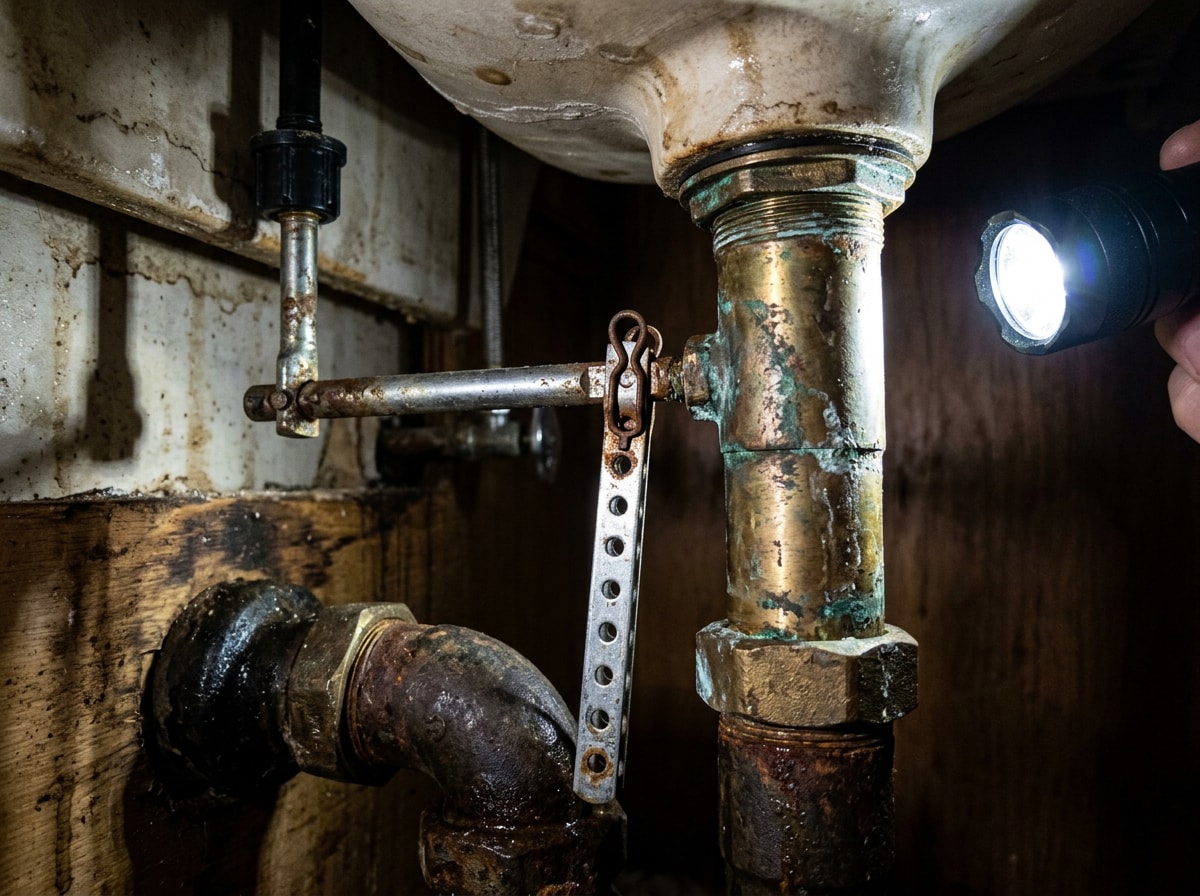
A pop-up drain stopper connects to a pivot rod that runs horizontally into the drainpipe underneath the sink. You'll spot it by looking under the basin for a thin metal rod threaded into a nut on the side of the tailpiece. This is the most common setup in older and mid-range bathroom sinks, and it's part of a larger drain assembly that includes a clevis strap and spring clip.
Push-Pull Sink Stoppers
A push-pull stopper has no hidden rod at all. You simply grip the visible knob on top and pull straight up to open or close the drain. There's no linkage to find underneath, just a stopper that sits directly in the drain opening.
Lift-and-Turn Drain Stoppers
A lift-and-turn stopper uses a small twist knob built into the top of the stopper itself. Turning the knob counterclockwise while lifting releases an internal rubber gasket that holds it in place. These stoppers look similar to push-pull styles at a glance, but the knob only rotates a quarter turn or so before it catches.
Tools and Materials Needed
Gather everything before you start so you're not dripping water across the bathroom floor mid-project. Most of these tools are already in a basic homeowner toolbox.
- Adjustable wrench or channel-lock pliers
- Flathead screwdriver
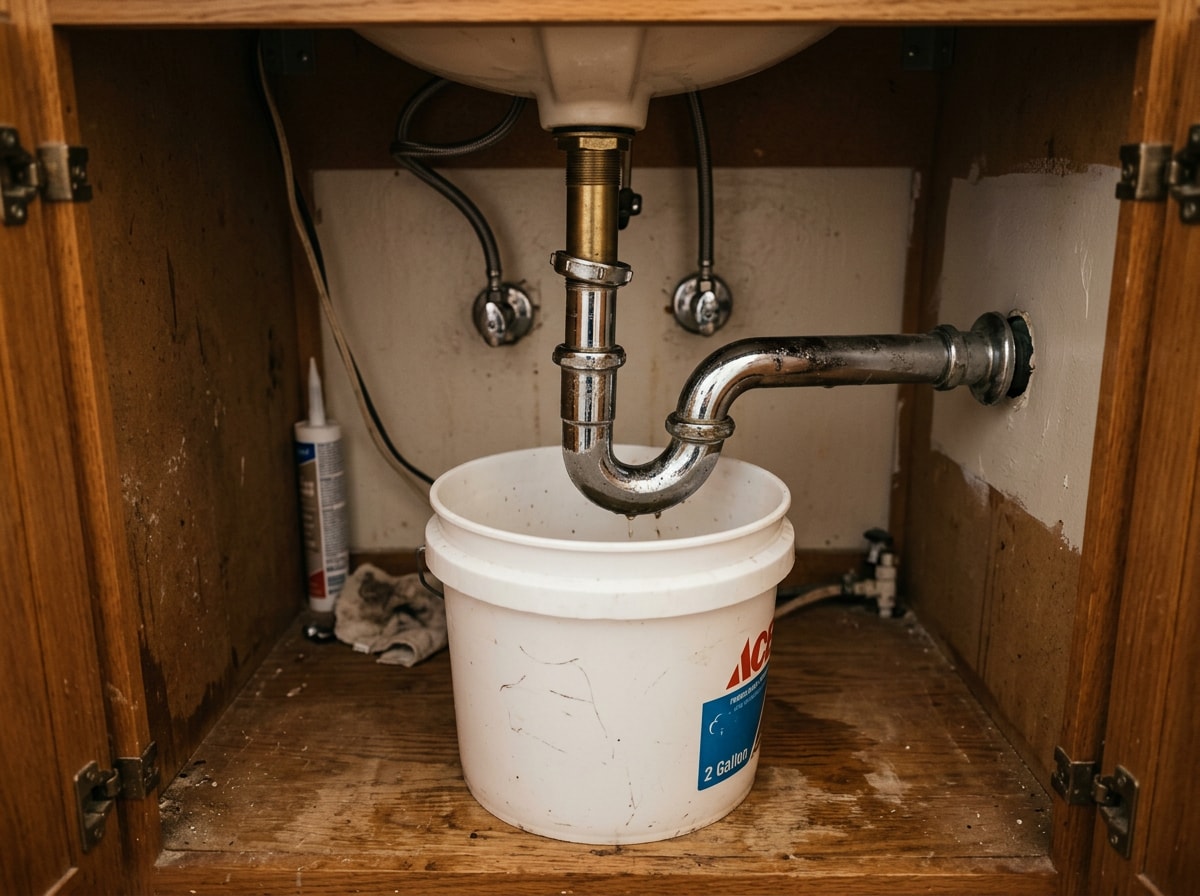
- Bucket, for catching residual water from the P-trap
- Flashlight
- Old towel or rag
- Plumber's putty (if reassembling)
Fully clear out the cabinet underneath the sink and slide the bucket into place under the P-trap before loosening anything. This single step prevents the small puddle of standing water inside the trap from soaking everything stored below.
If you're planning to reseal with fresh plumber's putty, check the material under your sink first. Regular oil-based putty can stain or react with porous surfaces like granite, marble, quartz, and cultured marble, so manufacturer guidance on plumber's putty recommends stain-free formulas for these surfaces since oil-based putty may stain porous materials such as granite, marble, quartz and sandstone . For composite or cultured marble bathroom sinks, that detail matters more than it seems.
How to Remove Common Types of Sink Stoppers
Almost every stopper follows the same basic logic: disconnect any linkage underneath the sink first, then lift or twist the stopper free from above. Working below before above prevents you from fighting a connection you can't see.
Pop-up Stoppers
- Locate the pivot rod underneath the sink where it threads into the tailpiece nut.
- Find the clevis strap and spring clip holding the rod to the vertical lift rod, squeeze the clip, and slide it off.
- Unscrew the pivot nut counterclockwise to pull the pivot rod free.
- Go back to the top of the sink and lift the stopper straight out of the drain opening.
Trying to pull the stopper out before disconnecting the pivot rod underneath is the most common mistake homeowners make here. It simply won't budge until that connection is loose.
Push-and-Pull and Toe-Touch Stoppers
Push-pull removal is usually a quarter-turn twist counterclockwise, then a straight lift. No tools are needed for most models.
Toe-touch stoppers work a little differently:
- Press the stopper down into the open position first.
- Twist the cap counterclockwise while holding the base steady.
- Once the cap releases, lift the stopper free the same way you would a push-pull style.
If it feels stuck, a light counterclockwise wiggle usually breaks it loose without tools.
Flip-It and Trip Lever Stoppers
A flip-it stopper is generally the easiest design to remove:
- Flip the lever on top to the open position.
- Twist the stopper body counterclockwise.
- Lift it out.
Trip lever stoppers, found in some tub-style bathroom sinks, work similarly: move the trip lever to the open setting, then gently pry or twist the stopper free. Neither design relies on a rod or spring clip underneath, so there's nothing to disconnect first.
Step-by-Step Guide to Removing a Full Bathroom Sink Drain Assembly
Removing the stopper only solves part of the job. If you're replacing the drain, fixing a leak, or doing a deep clean, you'll need to remove the full assembly: flange, P-trap, and tailpiece.
Remove the P-Trap
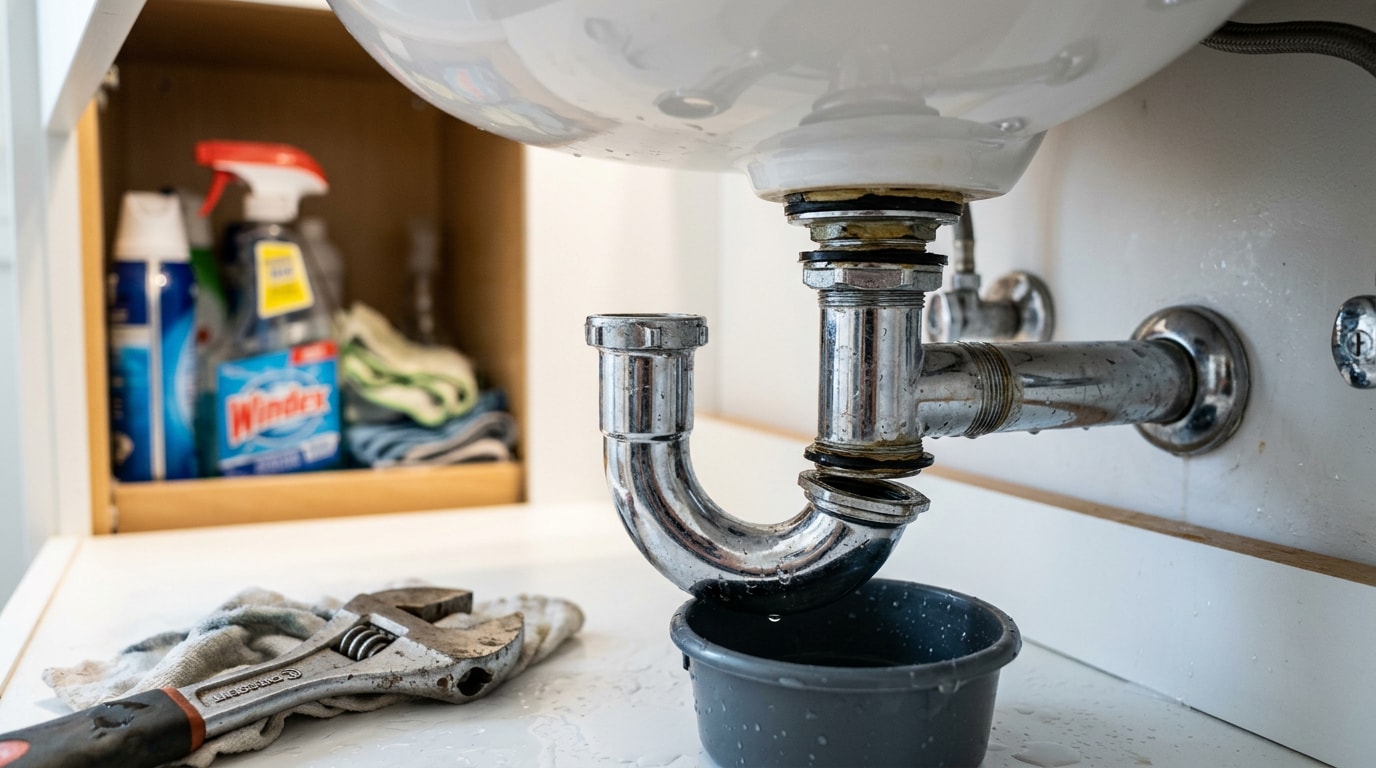
Slide your bucket directly underneath the curved pipe first, since a small amount of standing water always remains inside it. Loosen the slip nuts on both ends of the trap by hand; if they won't budge, use an adjustable wrench with light, even pressure.
The P-trap exists specifically to hold a water seal that blocks sewer gas from entering the home. Illinois's own plumbing code backs this up directly: all directly connected plumbing fixtures, except those having integral traps, must be separately trapped by a water-seal trap, placed as close to the fixture outlet as possible , and each trap must hold a water seal of at least 2 inches except where a deeper seal is needed to prevent loss of the seal by evaporation . That requirement isn't new, either; trapping fixtures with a water seal has been standard in plumbing codes for almost 100 years .
Once both slip nuts are loose, lower the trap carefully and let any remaining water drain into the bucket.
Unscrew the Drain Flange
With the P-trap out of the way, reach up into the drain opening from below and turn the flange counterclockwise. On many sinks, you can also grip the crossbars of the flange from above with pliers to add leverage.
Once it's loose, lift the flange and its rubber gasket out together. You'll likely reuse the flange, but plan to replace the gasket if it's cracked or flattened.
Clean the Drain Opening
Old plumber's putty tends to harden into a dark ring around the drain opening over time. Scrape it away with a plastic putty knife or an old rag, then wipe the opening down so it's free of debris. A clean surface matters here, since leftover putty residue can keep a new seal from forming properly during reassembly.
Reassemble the Drain
Reassembling the drain is these same steps in reverse:
- Roll a fresh bead of plumber's putty around the flange and set it into the opening.
- Tighten it back down from below.
- Reconnect the P-trap slip nuts by hand, then snug them slightly with a wrench, not fully tight, just enough to seat them.
- Run water for a few minutes and check every connection for drips.
Catching a small leak now saves a bigger headache later.
Dealing with Stubborn Drain Flanges
A flange that won't turn is almost always dealing with corrosion or hard water buildup, not just an overly tight fit. Hard water isn't a health concern on its own, but it can lead to build-up on plumbing and appliances and damage a home's plumbing system over time , which is exactly the kind of calcification that fuses a flange's threads in place.
Start with a penetrating oil applied to the threads and let it sit for fifteen to twenty minutes. A little gentle heat from a hair dryer can also help expand the metal slightly. If the flange still won't move after reasonable effort, stop forcing it. Excessive torque can crack the sink basin, and that's a far more expensive repair than a stuck fitting. At that point, it's worth reaching out to our team rather than risking damage to the sink itself, or reading our regional guide to plumbing drain repair for more on diagnosing stubborn fittings before you call anyone.
FAQ
How Do I Unscrew My Bathroom Sink Drain?
Most bathroom sink drains unscrew counterclockwise from above once the P-trap has been disconnected below. Use pliers on the flange's crossbars for grip, then lift it out along with the rubber gasket underneath. The full process is covered step by step in the section above.
How Long Does It Take to Remove a Bathroom Sink Drain?
A straightforward removal, stopper and full assembly, usually takes 20 to 45 minutes for a first-timer with the right tools on hand. Corrosion, a stuck flange, or a hidden retaining clip can add another 15 to 30 minutes.
Do Bathroom Sink Stoppers Come Out Without Tools?
Push-pull, toe-touch, and flip-it stoppers usually come out by hand with a simple twist-and-lift motion. Pop-up stoppers are the exception. They require disconnecting a pivot rod underneath the sink before the stopper will lift free from above.
I Can't Unscrew My P-Trap. What Can I Do?
Apply penetrating oil to the slip nut threads and let it soak for fifteen minutes before trying again. Gently wiggling the trap while turning can also help break a stubborn seal. If corrosion has fused the metal, it may be time to get a free estimate rather than risk snapping the pipe.
I Can't Unscrew My Pop-Up Drain. What Can I Do?
Double-check that you haven't missed a hidden retaining clip holding the pivot rod in place underneath the sink. If everything below is disconnected and the stopper still won't lift, use pliers wrapped in a cloth for extra grip without scratching the finish.
How Do I Unscrew the Sink Drain Pipes?
Below the P-trap, the tailpiece connects to the drainpipe through additional slip nuts. Turn each slip nut counterclockwise by hand or with a wrench, working from the trap downward toward the wall or floor connection, and keep the bucket in place the entire time.
---
Most of this job is straightforward with patience and the right tools, but corroded flanges, cracked basins, and hidden leaks are where DIY projects turn expensive fast. If you'd rather hand off the stopper swap, the full drain replacement, or anything in between, get a free estimate from our team, or visit Central Illinois Gutters to see the rest of what we handle for homeowners across Sangamon County and the surrounding area.